With Nulab Cloud we offer several delivery options to meet your cost and time requirements. Please note that we only ship orders within Australia and New Zealand.
All products are created on-site at our Melbourne lab, under the strictest quality controlled conditions. In-house production times are product specific. Here is a list of Estimated Processing Times for our products. We are committed to despatching your order within these recommended service times.
If your order contains multiple product types, it will be shipped once the entire order is complete.
Please allow time for delivery. The time it takes for your order to arrive will depend upon the delivery method you choose.
Australia Post Standard Post delivery has an estimated delivery time of 5-15 business days. This service is for prints only up to 20x30cm (8x12") with a total weight of 500g or less and costs $6.00. Choosing Standard Post delivery does not allow your order to be tracked. Nulab will not be held responsible for orders lost in transit with Australia Post.
A trackable overnight delivery service to most metro and country destinations. Price varies depending on size, weight, quantity and destination and starts at $15.00 for a parcel up to 3kg.
A trackable 3-5 day business day delivery service to most metro and country destinations. Price varies depending on size, weight, quantity and destination and starts at $13.00 for a parcel up to 3kg.
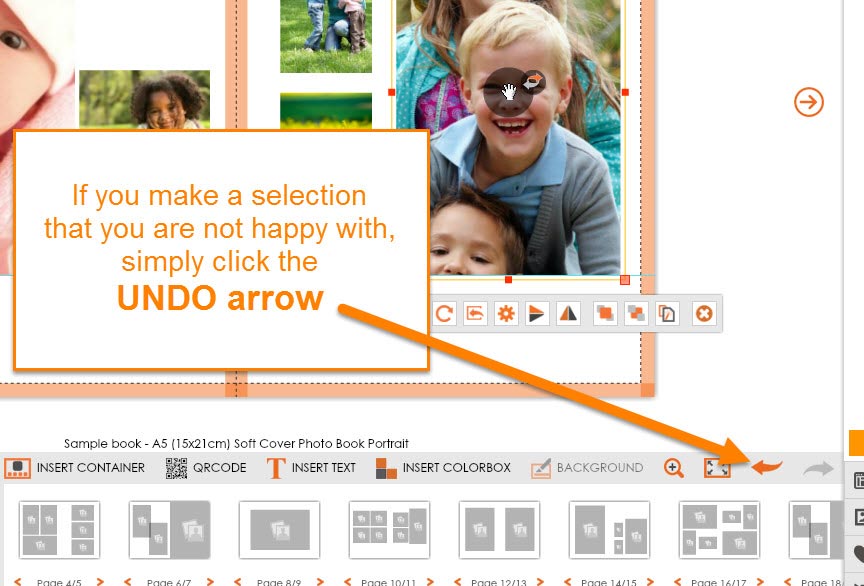
IMPORTANT:
![]()
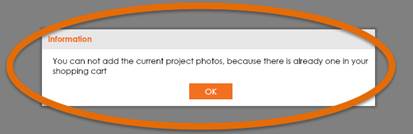
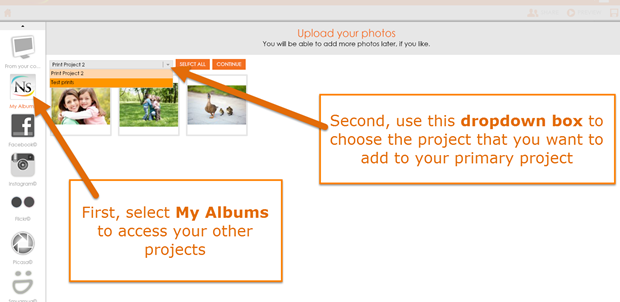
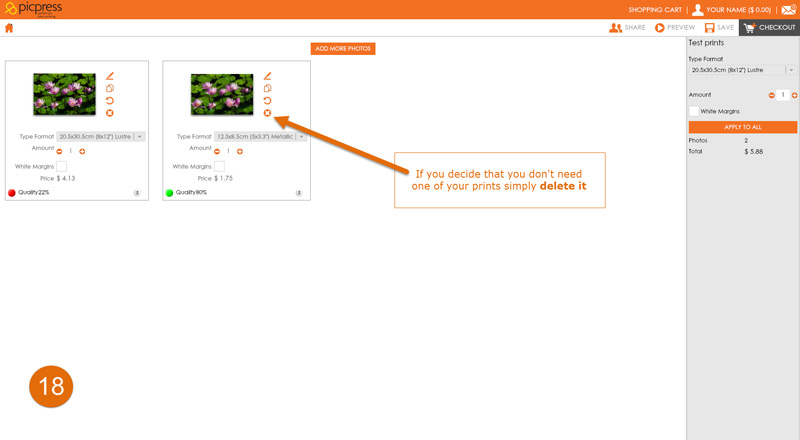
The shopping cart only allows ONE PROJECT OF PRINTS PER ORDER.
If you try to add a second print project to your basket, an error message similar to this will appear:
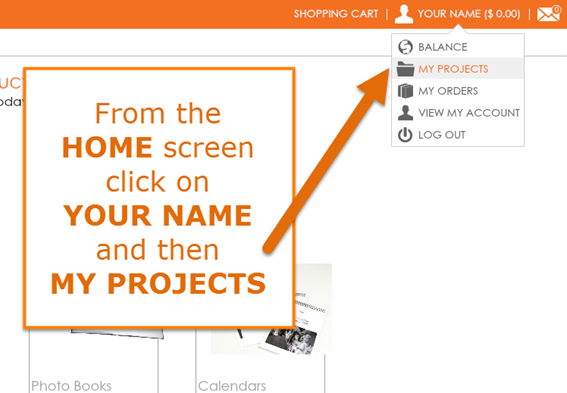
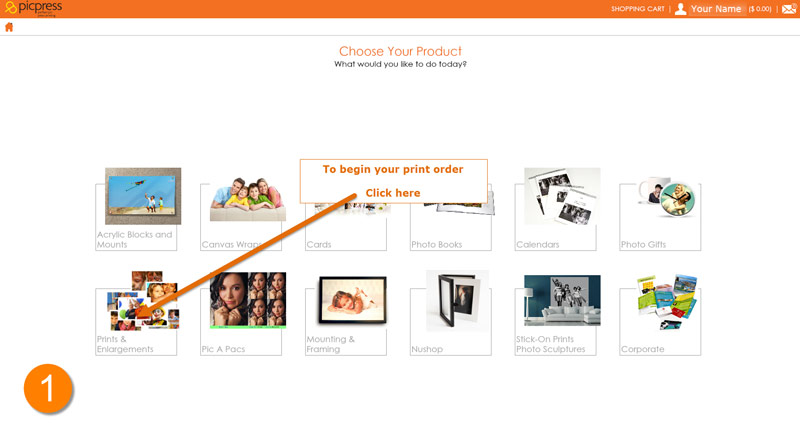
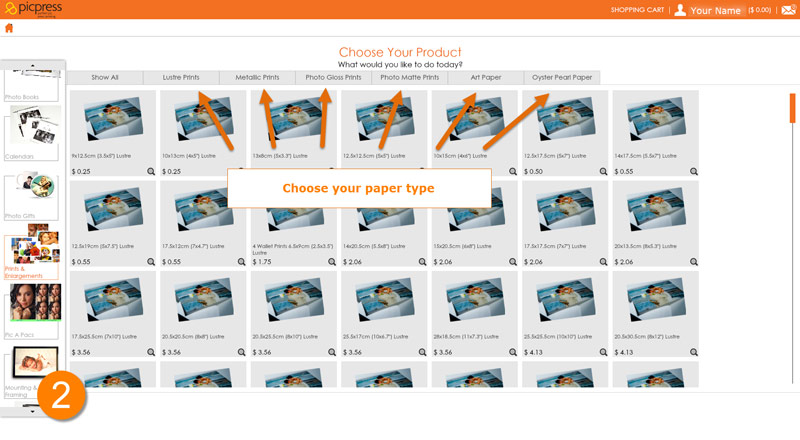
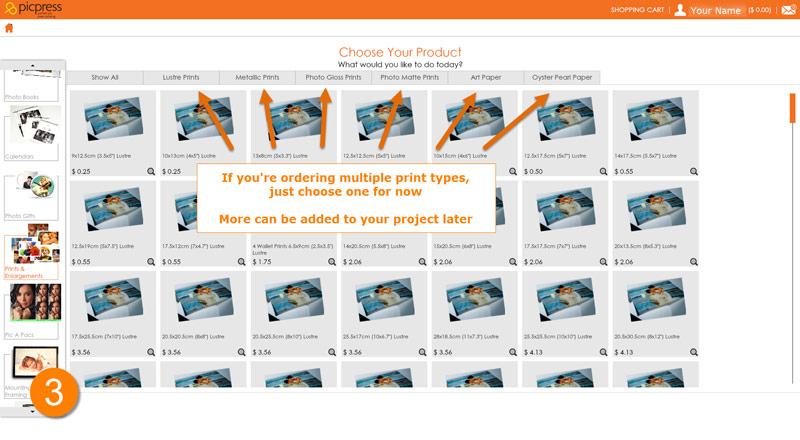
But there’s no need to panic! Follow these simple steps you add your Prints & Enlargements together into one project:
Step 1

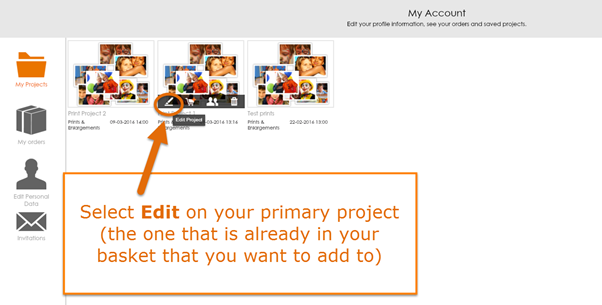
Step 2
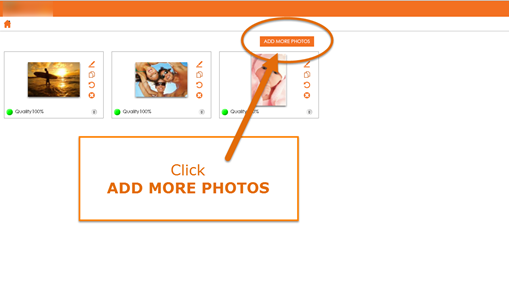
Step 3
Step 4
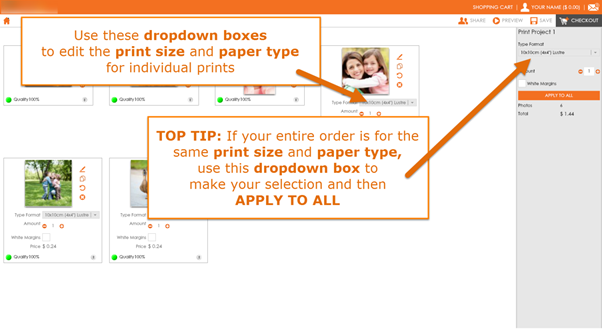
Step 5
Step 6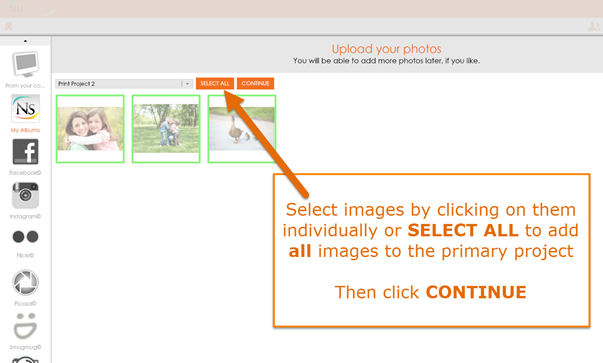
Step 7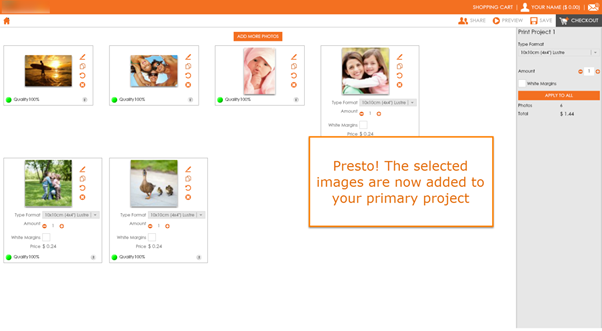
Step 8
Step 9
![]()
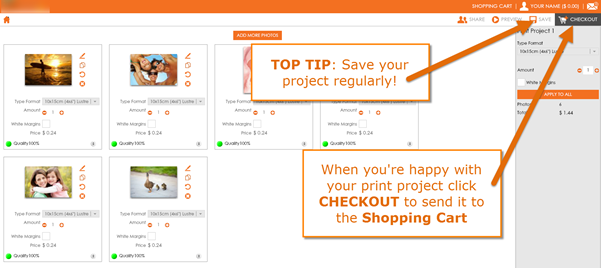
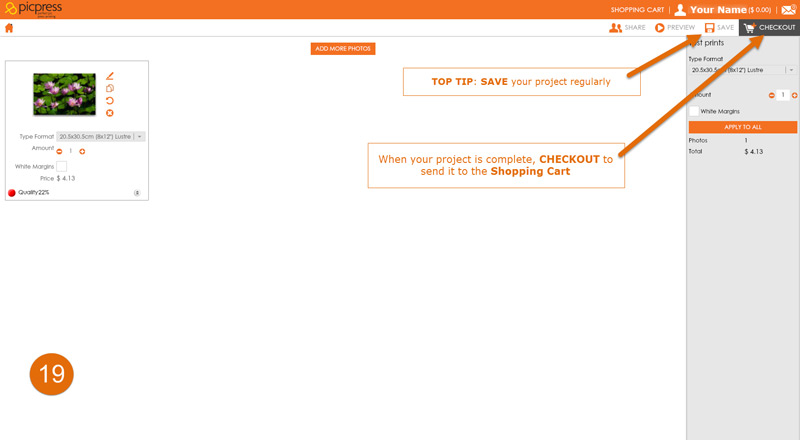
Add your projects to the shopping cart, then CONTINUE
Choose Express Service if required, then CONTINUE
Select delivery options, then CONTINUE
Choose Balance from payment options
Check delivery and invoice address details, then CONTINUE
Your order will process. If you have not got enough funds to pay for the order in full you will be asked if you wish to continue with the order.
Select YES to make remainder of payment using a different payment method.
MAKE THE PAYMENT(there will be a $ amount after this text – this refers to the amount you’ve already paid, not what you owe)
Choose CREDIT CARD or PAYPAL and click PAY NOW
Enter payment details and SUBMIT
Voucher codes can be applied to individual projects within the basket by clicking APPLY COUPON
We accept all major credit cards and Paypal; you can pay on-line at our secure payment centre.
Yes. Here at Nulab we make every effort to secure your transaction with us, but it is still up to you to protect yourself with safe practices.
![]()
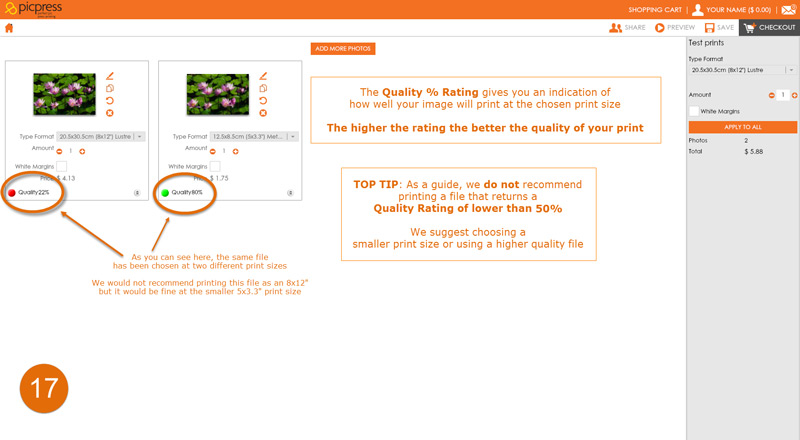
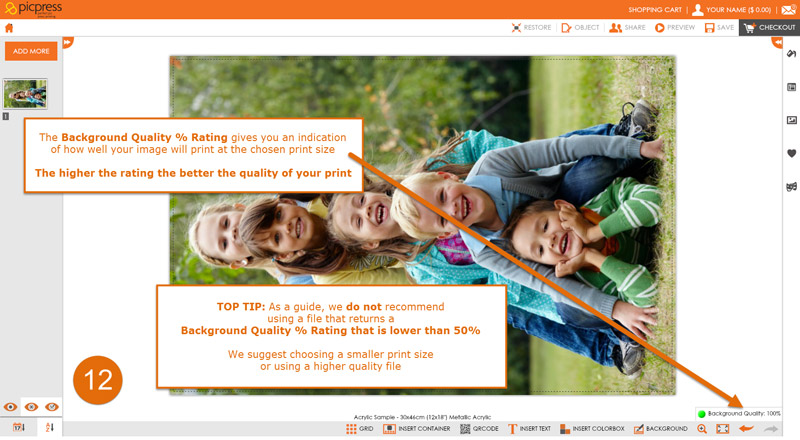
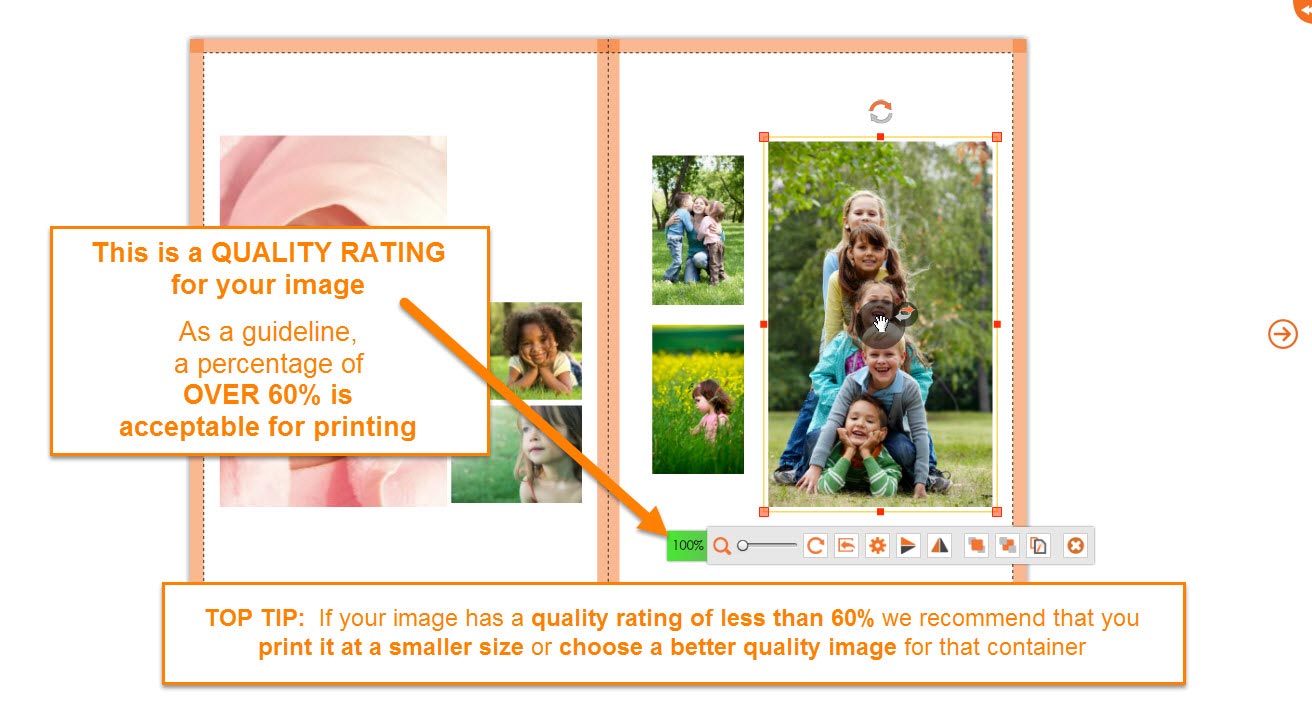
This rating gives you an indication of how well your image will print at the size selected. It is to be used as a guide only. We suggest that a rating above 50% is acceptable. If your image returns a rating lower than 50% we recommend that you select a smaller print size for that image.
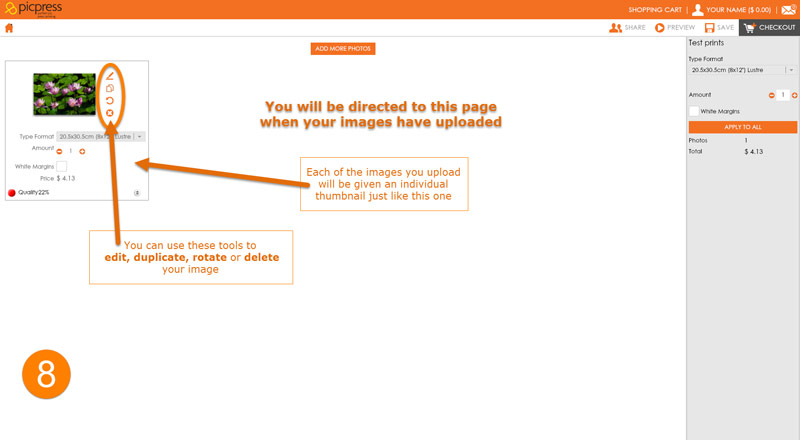
When you first open up a new project you will have options of many sizes. If you require one size only then choose that size and upload your files.
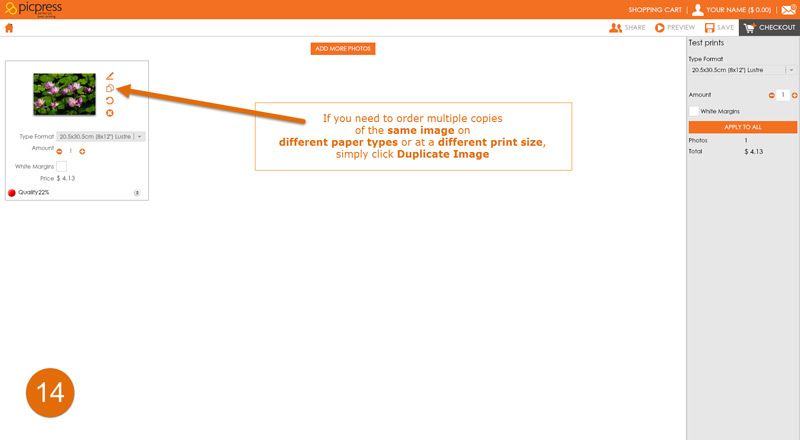
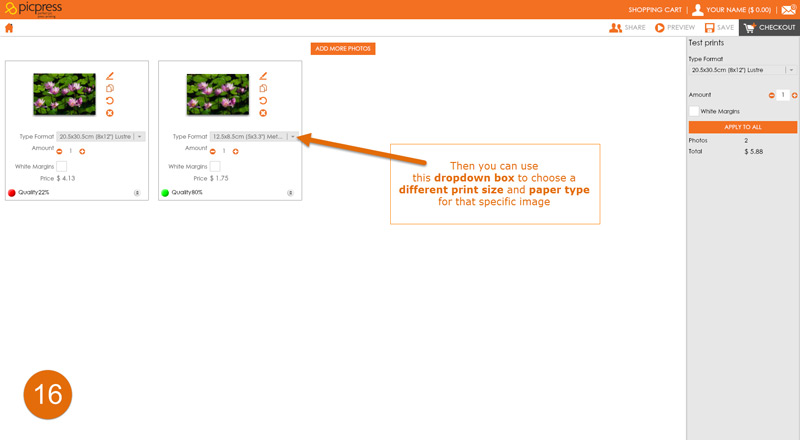
If you want multiple sizes from various files choose any size and add your files. Then use the drop down as below to choose a size for each individual file.
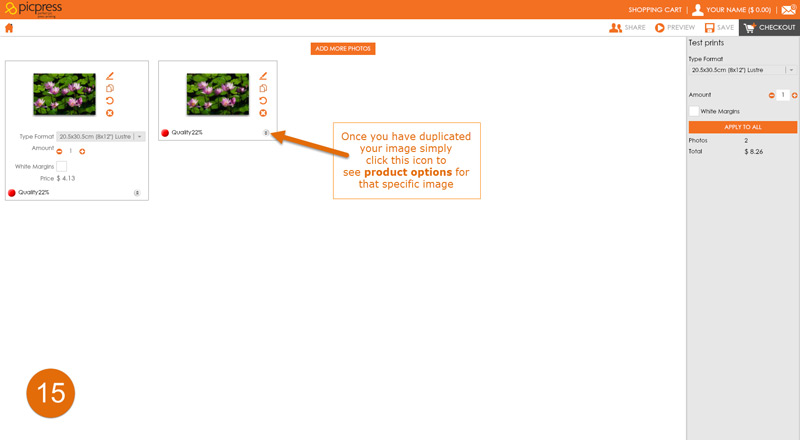
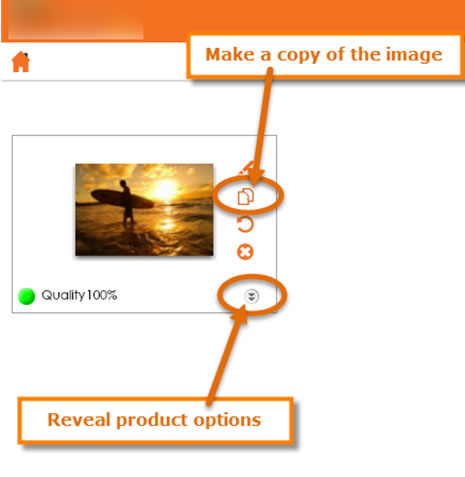
If you are ordering more that one size from the same file then the file will need to be uploaded MORE than once. To alter the size or print type, simply click the icon with two little arrows pointing down in the bottom right corner.


Step 1
Step 2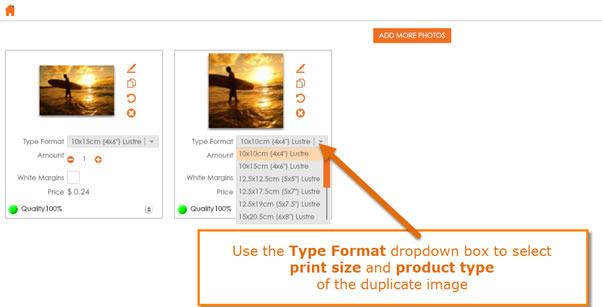
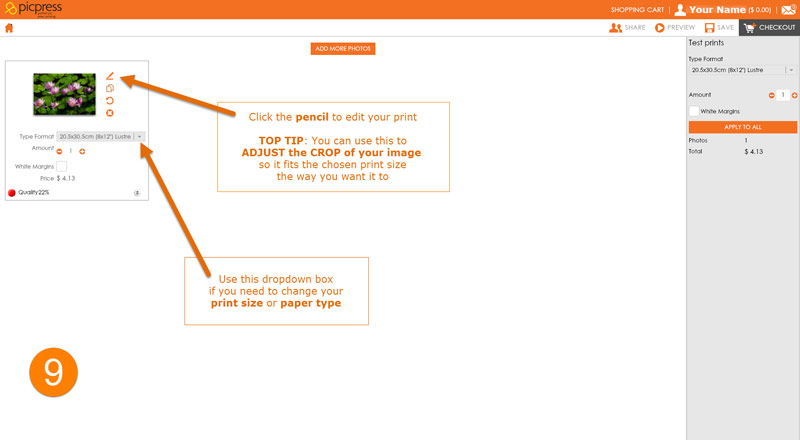
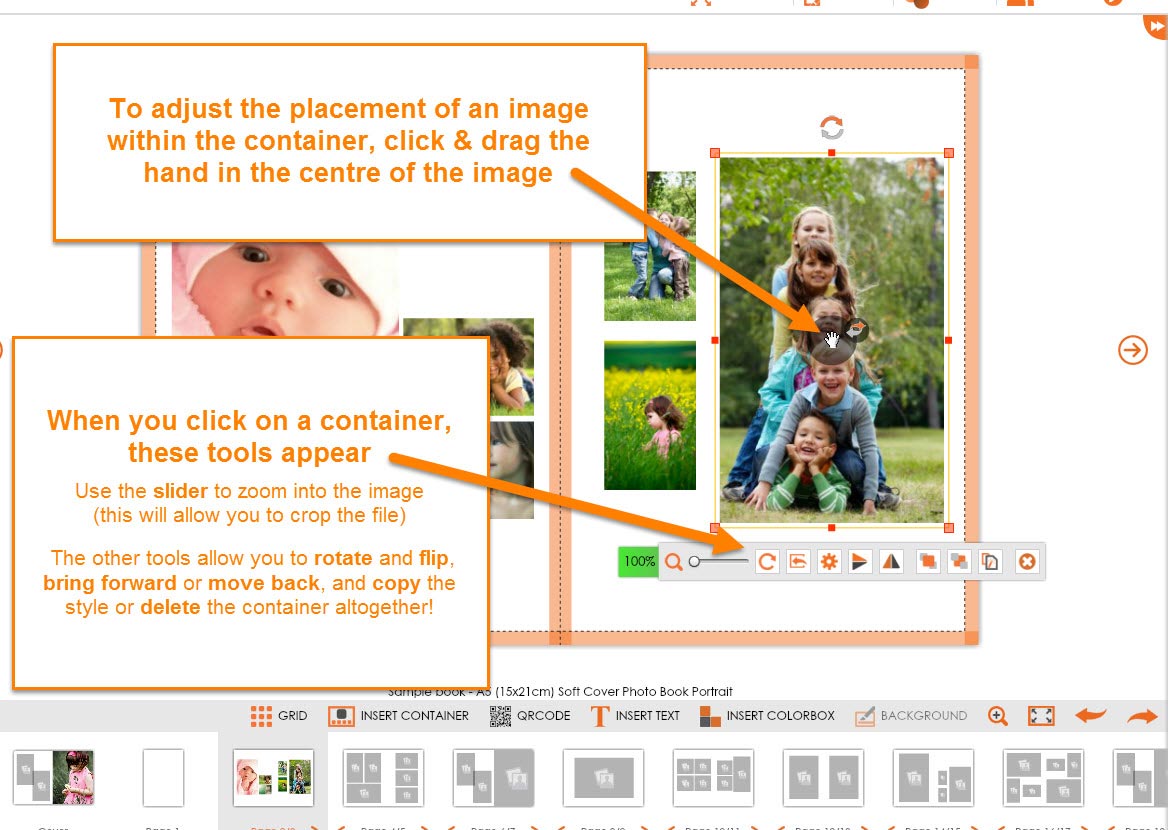
Sometimes the aspect ratio of your file will not match the ratio of the print size being ordered. If the preview thumbnail shows that your image has been cropped simply use the cropping tool to change the placement of your image within the product.
Please note: when you change the crop size the integrity of the file may be compromised.
Yes you can! Watch this short video tutorial to see how easy it is to adjust the crop of your image at the chosen print size
OR follow these simple steps after uploading your images:
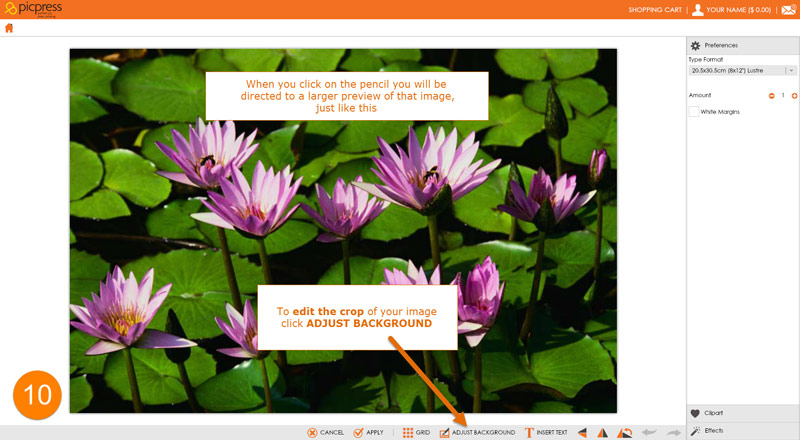
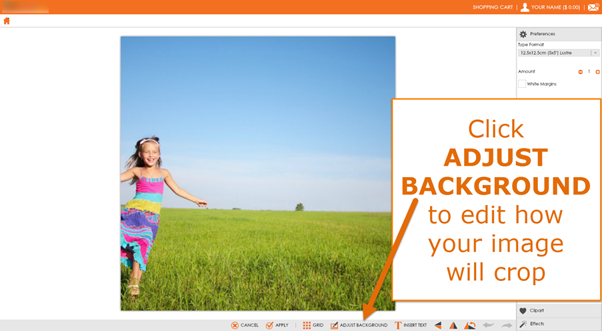
The preview you see after uploading your image shows you how the image will crop at your chosen print size.
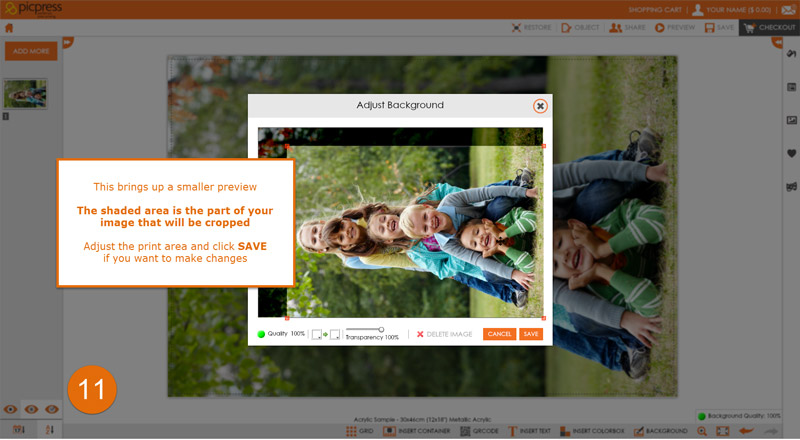
To edit the way your file is cropped, click the edit icon 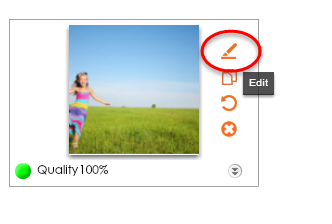
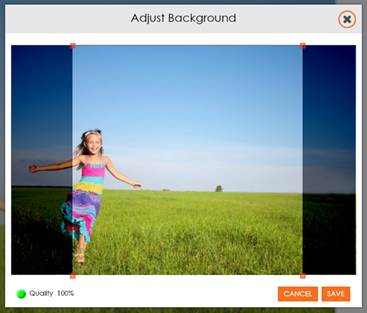
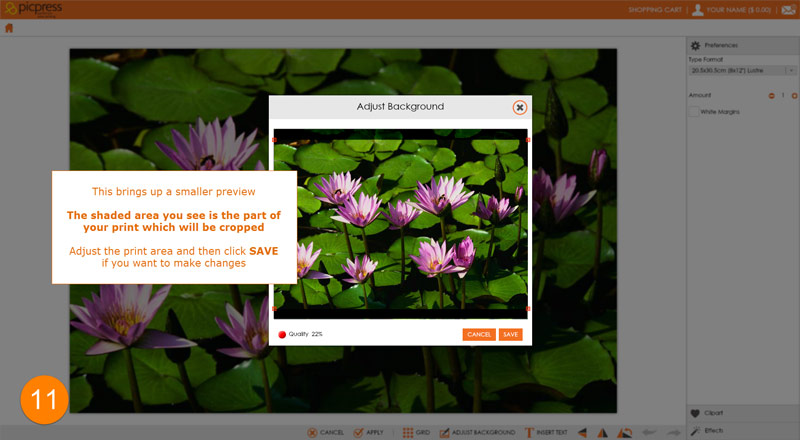
The shaded area you see is the part of your print which will be cropped. If you want to make changes, adjust the print area and then click Save to return to the large preview screen.
Once you’re happy with your edits, click APPLY.
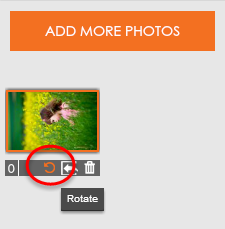
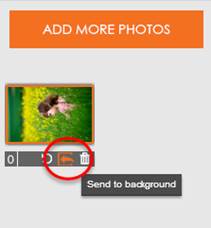
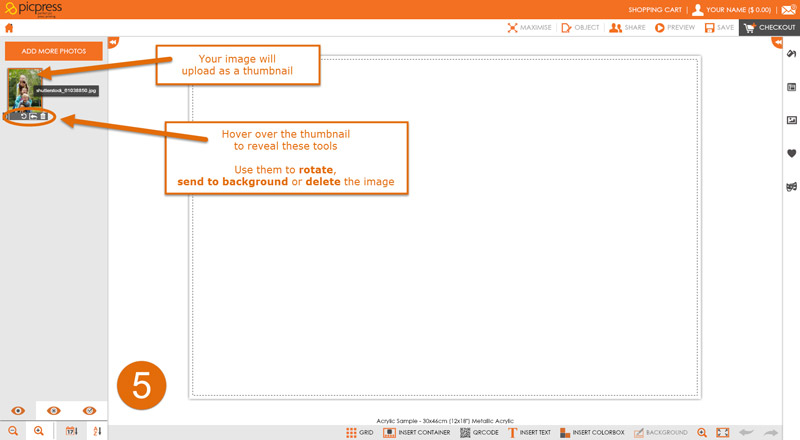
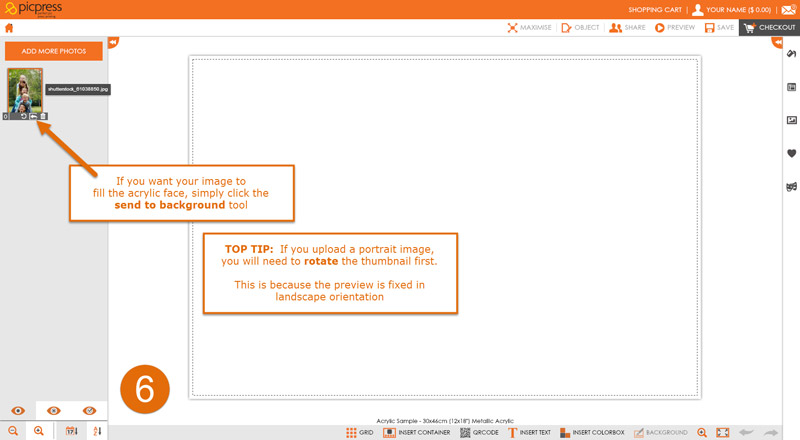
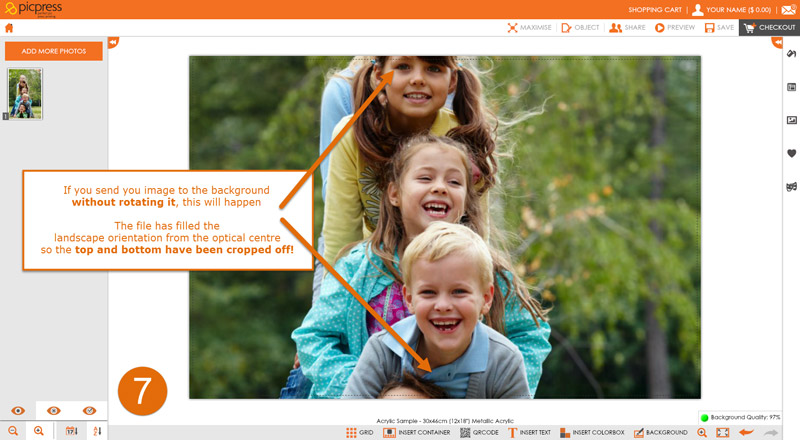
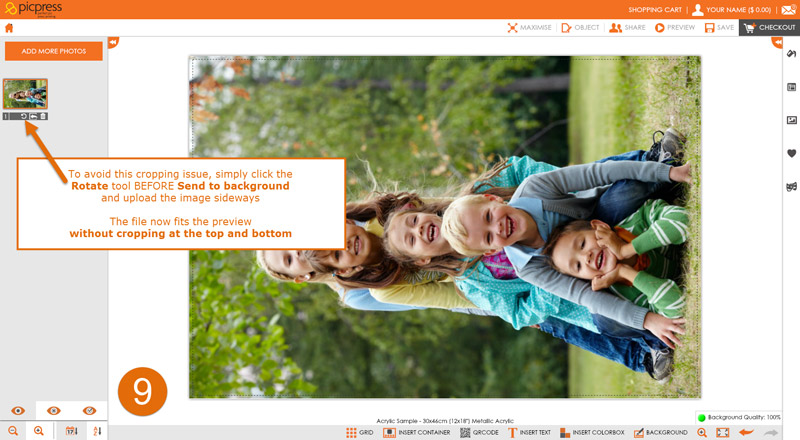
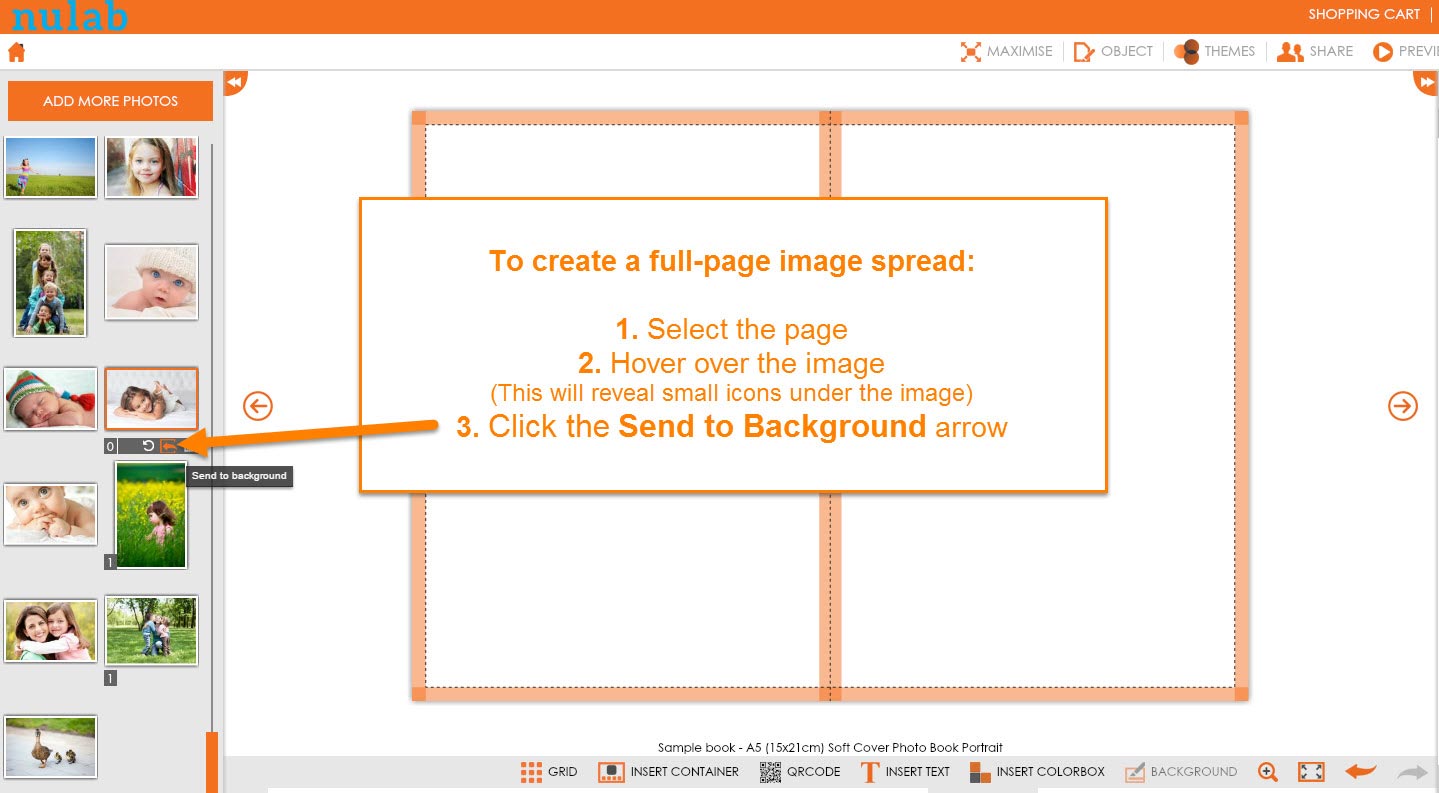
To upload your portrait image to fit the landscape preview, simply Rotate the thumbnail before you Send to background. Uploading your image sideways will not affect the outcome of your printed product in any way.
Note: If you think it isn’t obvious which way the hanger needs to be placed please leave instructions in the Comments box at the checkout.
When your images upload the software is taking into consideration the quality of the file, including the file size and slow upload may also be due to your internet speed.
![]()
Please see the slideshow below for a step by step guide

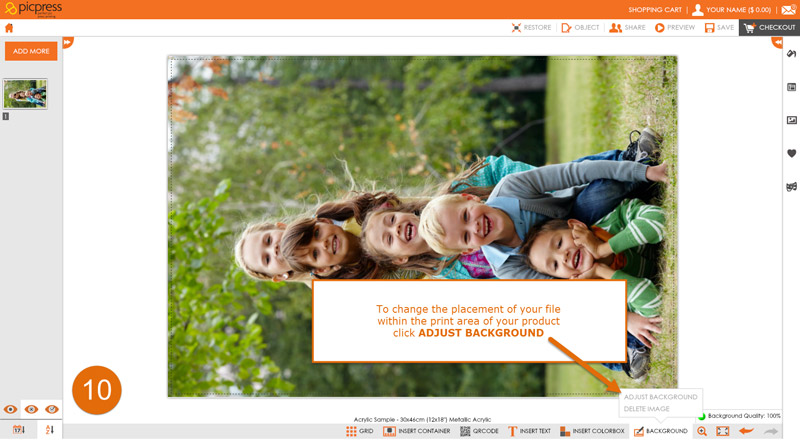
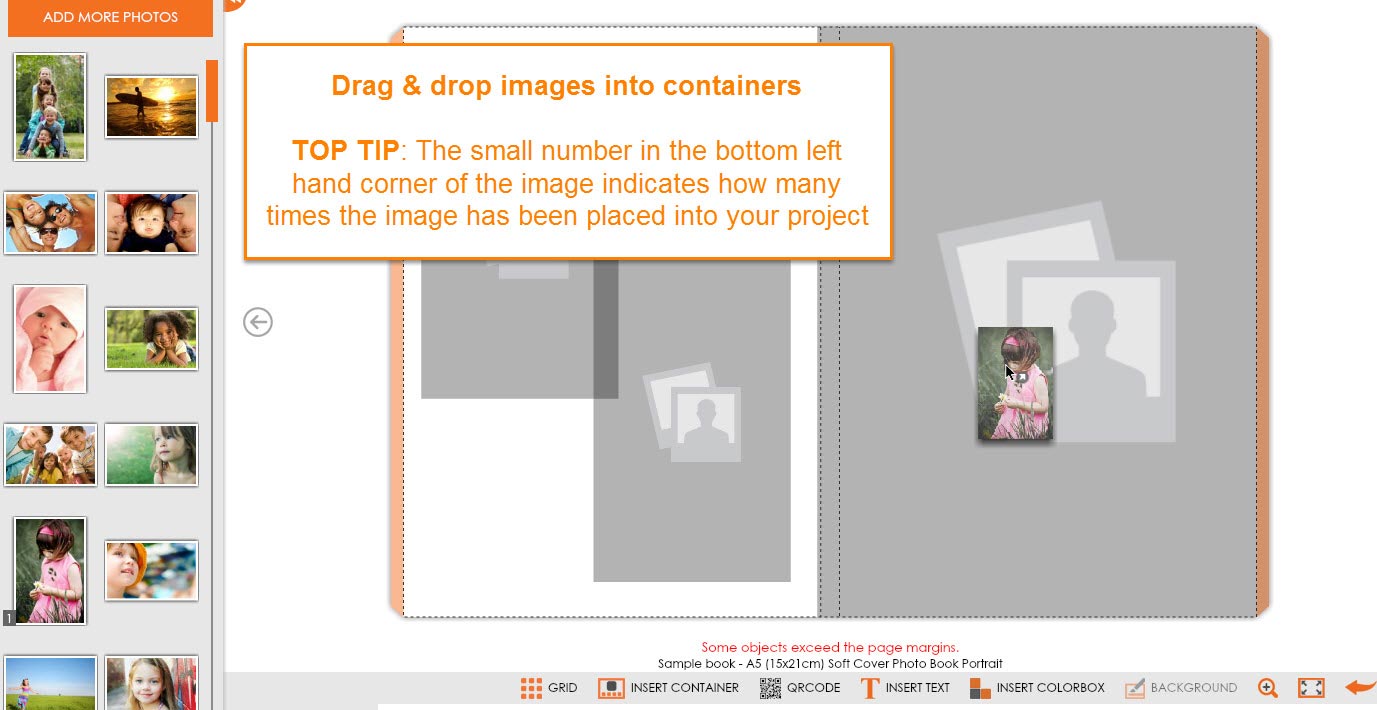
Can I change the placement of my image within the product?
My image is portrait but the preview is landscape. What do I do?
![]()
![]()
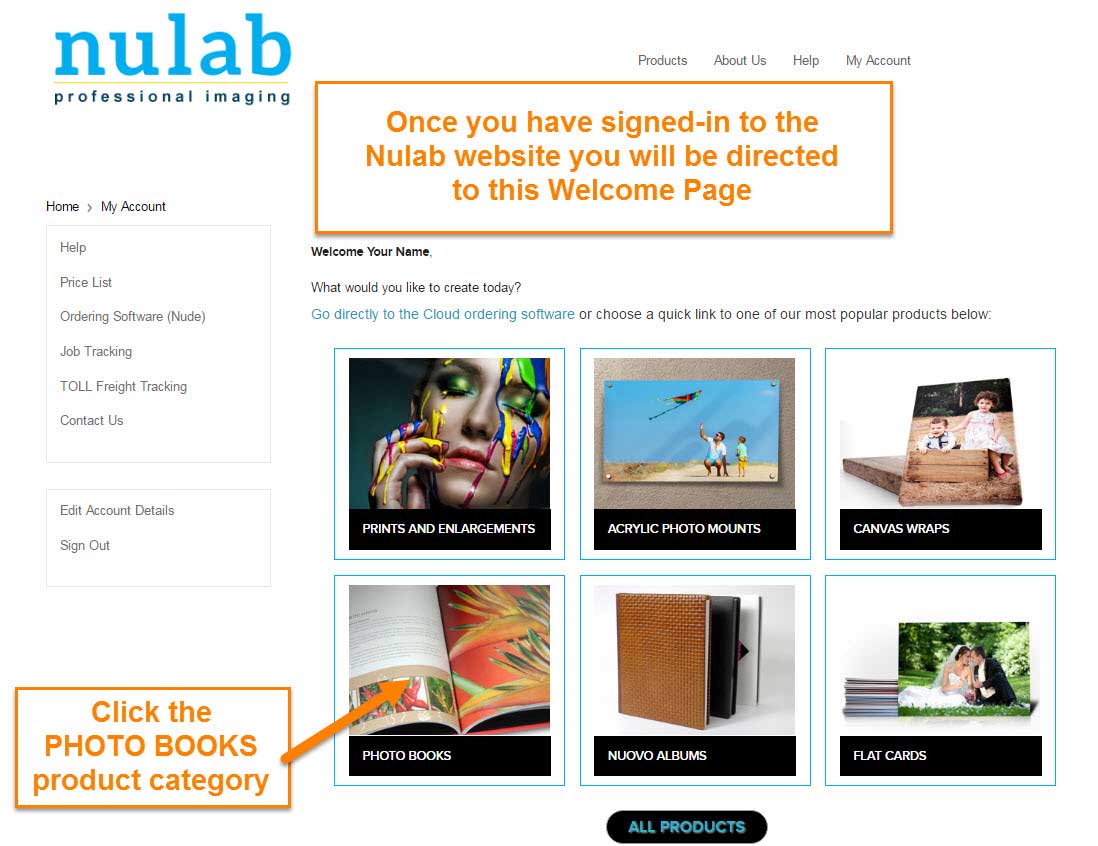
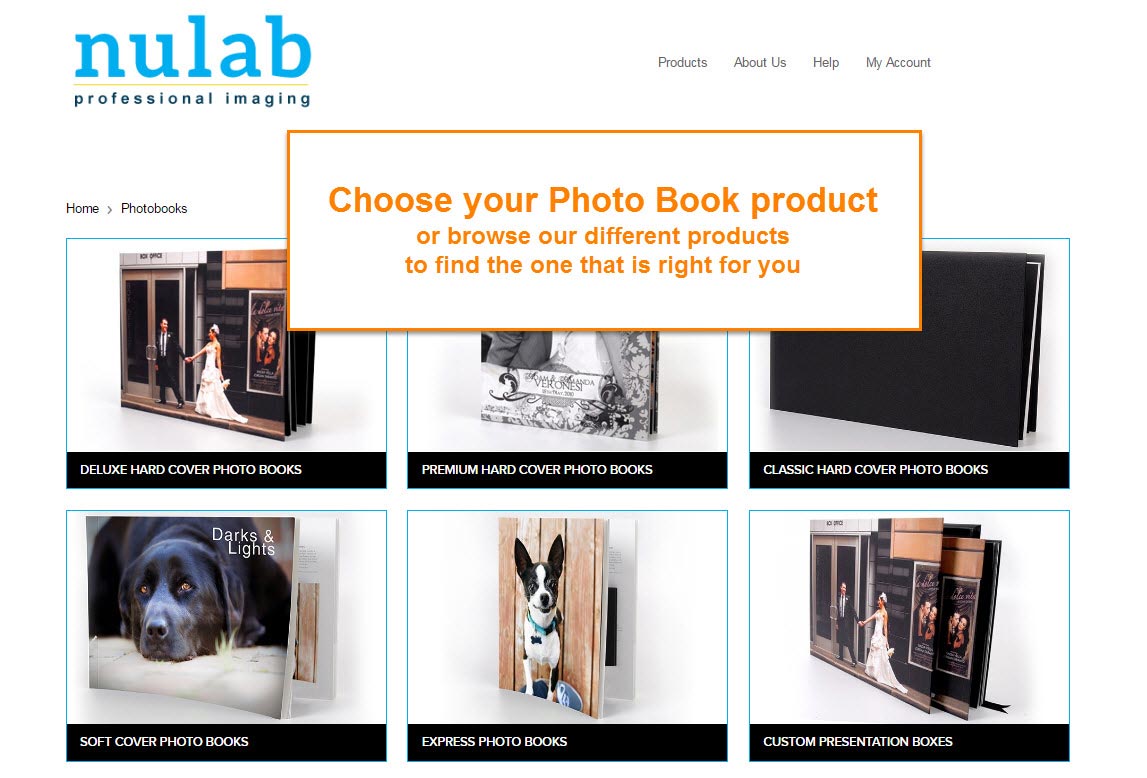
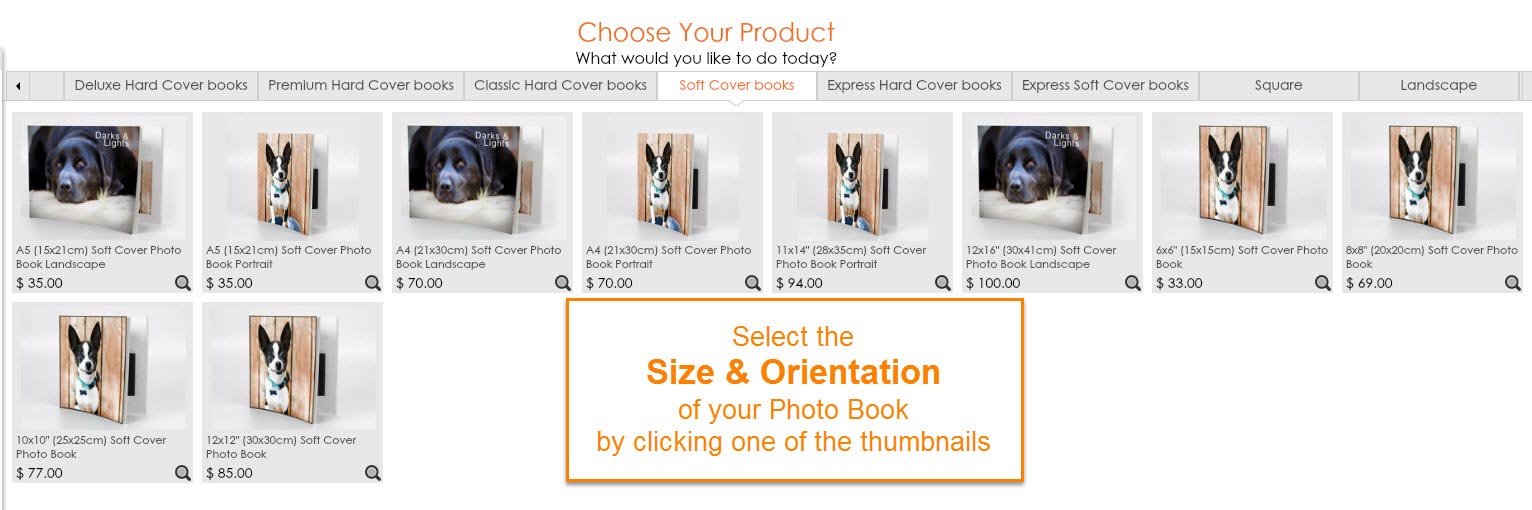
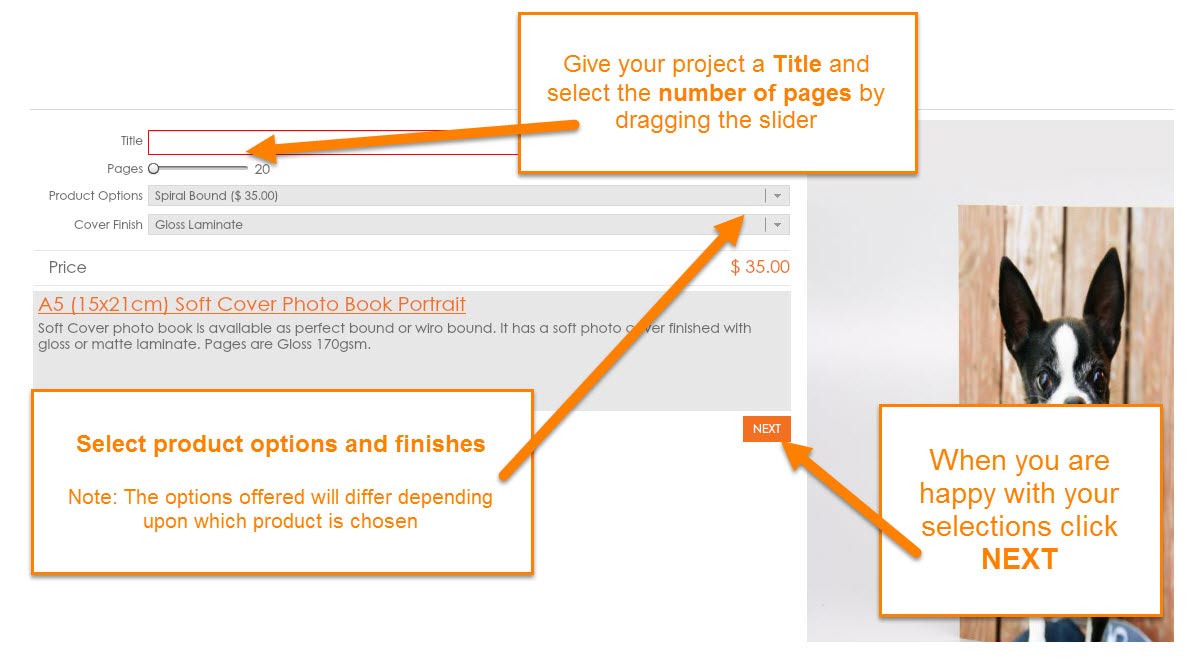
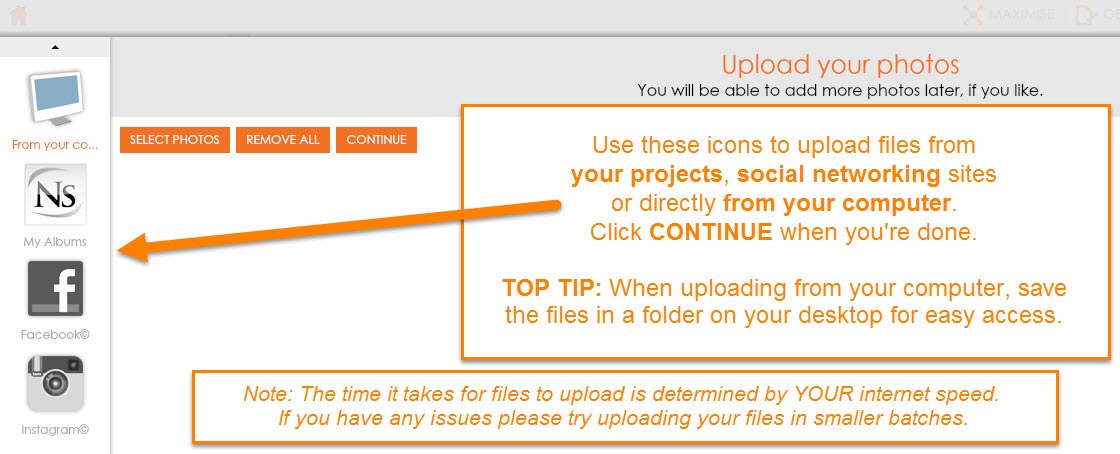
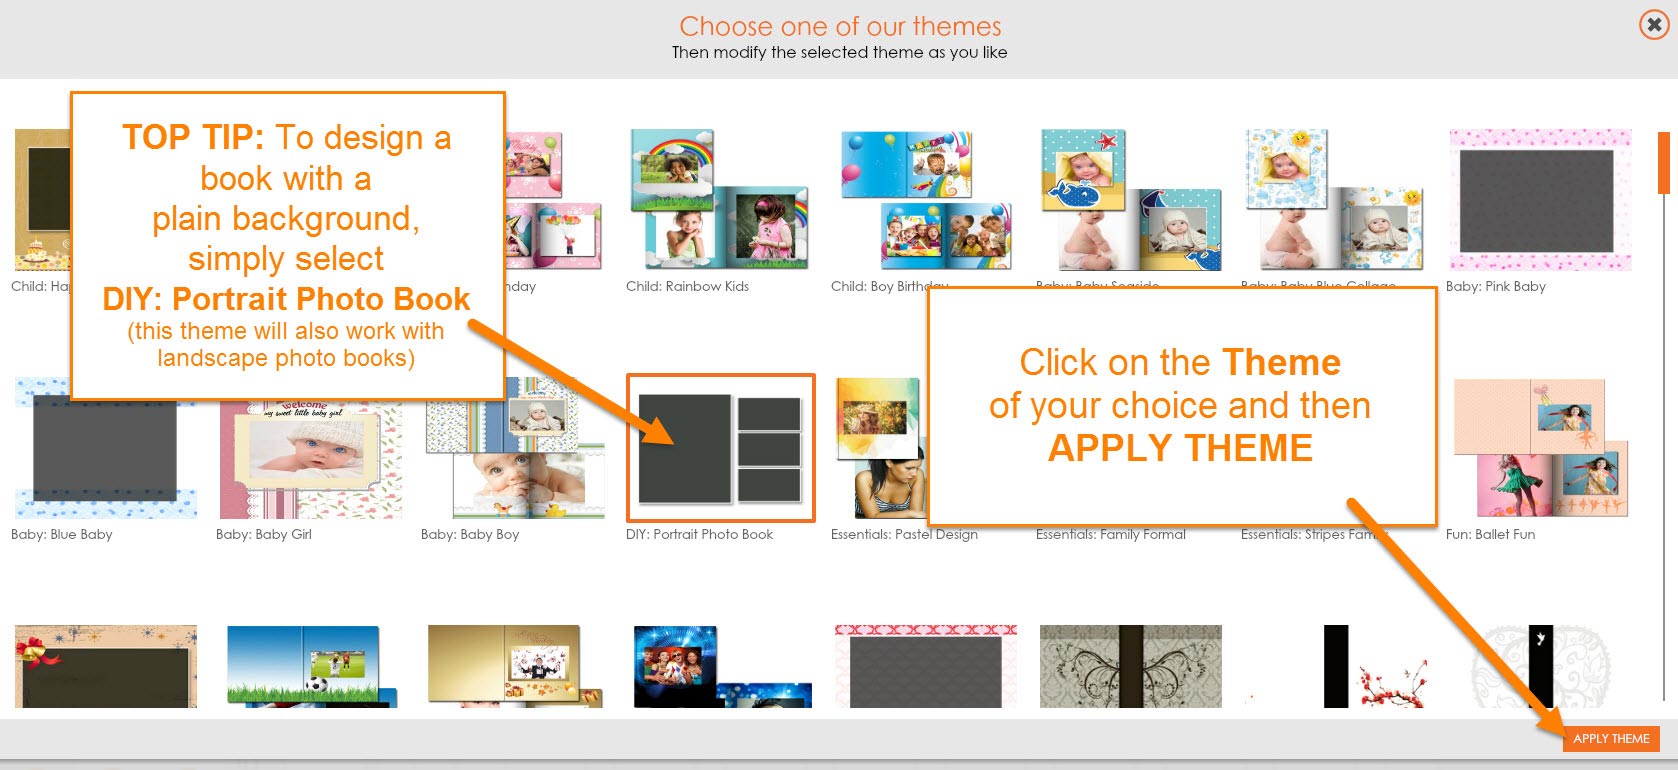
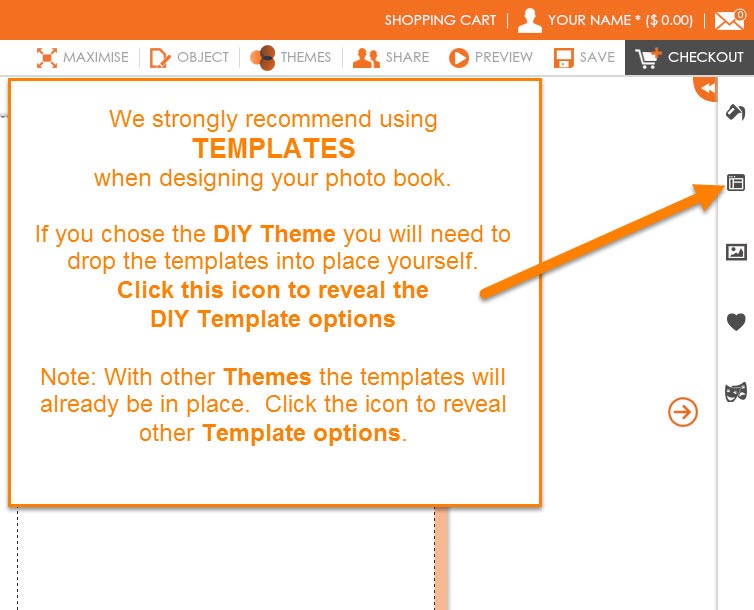
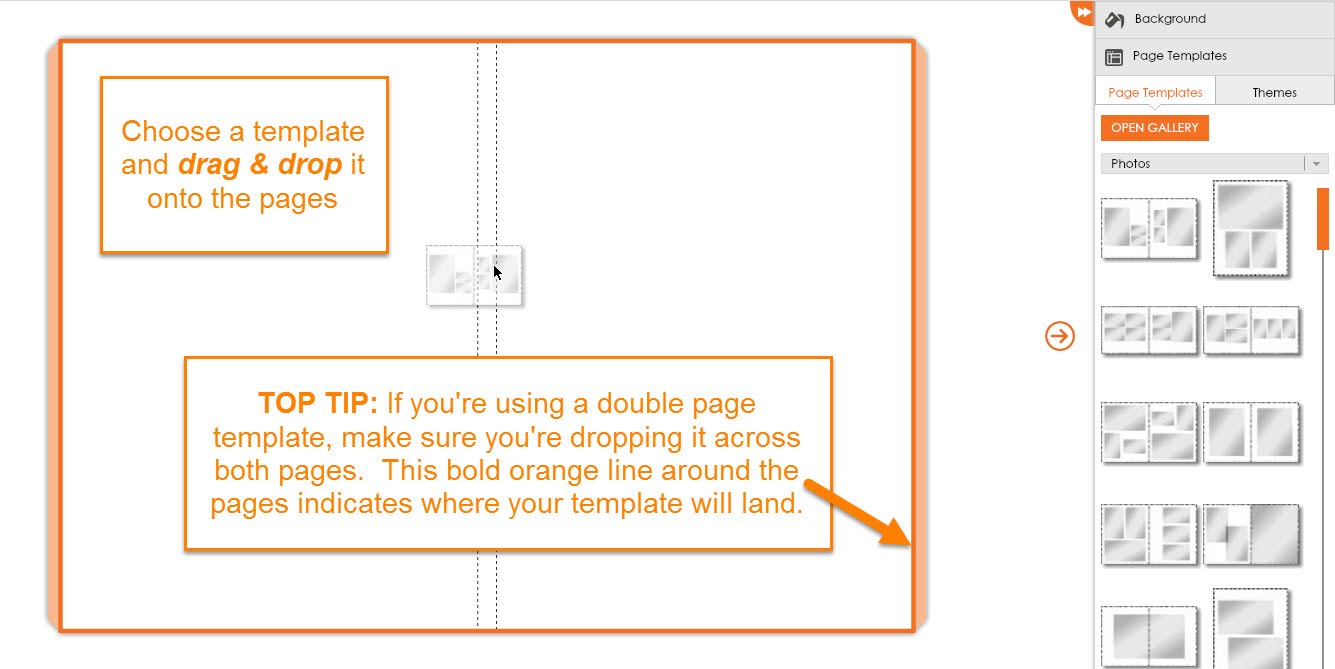
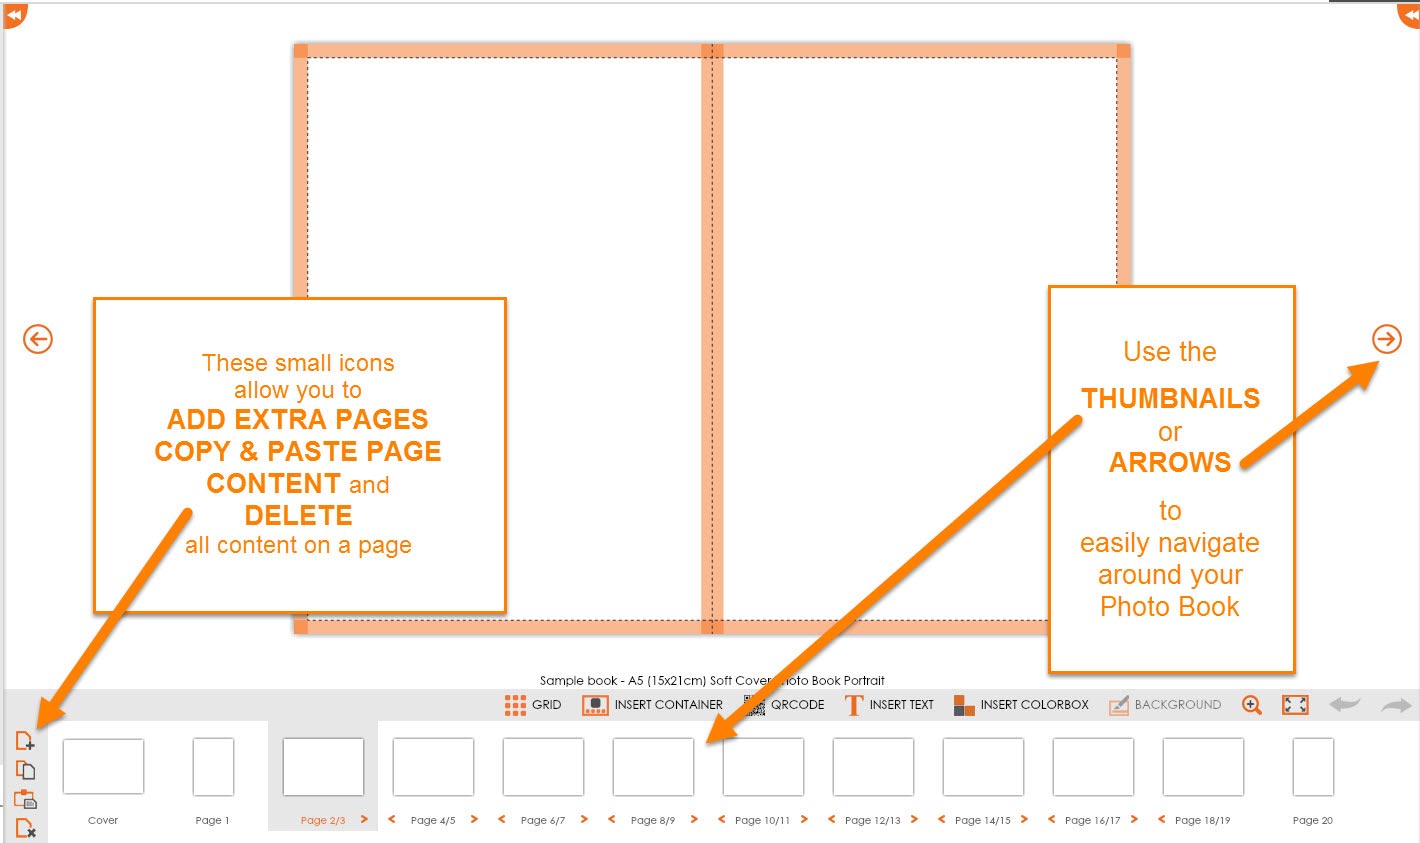
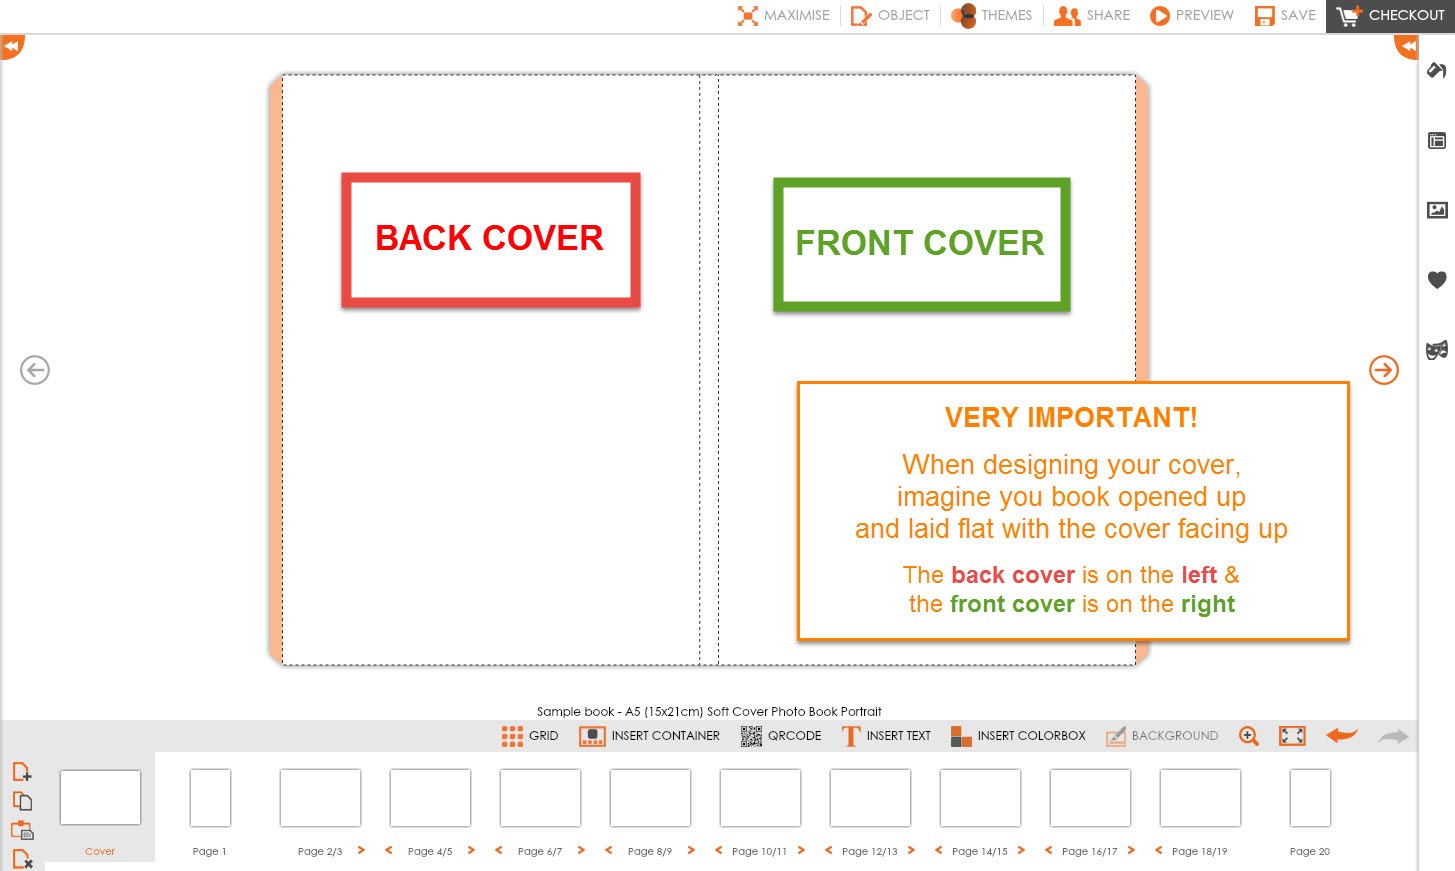
How to Order a Photo Book


No, the service is designed to work from your files as supplied to us. You may use our monitor calibration information in the colour management section as a guide. Colour correction is available for an additional fee.
Any PC or Mac computer made in the past 2 years and connected to the internet will be capable of running this software. Of course, the software will run faster on a faster machine with more RAM.
Typically a small book can take an hour of your time. You are in control of designing your book so you can take as little or as long a period of time as you like. The longest amount of time you will probably spend is in choosing the images!
Yes, we offer gloss or matte laminate for your pages in Deluxe, Premium and Classic book ranges, it can be selected as an optional extra when ordering.
Photo covers are available in all book ranges except Express Hard Cover and Classic Hard Cover books.
The book size is the cover size, so hard cover books may have pages slightly smaller than the listed book size. Please note however, that it is possible for the book size to vary up to 5mm from specifications.
![]()
There are templates available for calendars and cards in the ordering software.
Yes, envelopes are included in the price.
Your work environment greatly influences how you see your files on screen and in print. For best results you need to keep your surrounding colours as neutral as possible. The colours of the walls and ceiling in your work space can greatly affect how you see colour on your monitor. The colour of your clothes reflecting back on to your monitor can also affect this.
Please set your desktop display to neutral grey as bright colours and patterns can also affect how you view your images.
Setting up your Photoshop colour settings is simple and well worth your time.
These options, along with the ‘Colour Management Policies’ will make sure all images are in the proper colour space for you. They will alert you if not so action can be taken to correct the problem at the beginning of your workflow.
We highly recommend using a Spyder Colourdata calibrator for your monitor. This device cost a couple of hundred dollars and will provide a comfort level that what you are seeing is the same as you will see in your prints from Nulab.
Datacolor Spyder 5 Pro – calibration tool available from Kayell click here.
The Spyder Display device attaches to the front of your monitor and reads colour patches displayed by the software. Using these readings, the software helps optimize the brightness/contrast/colour output, removes any colour cast from your screen, and creates a profile describing how your monitor displays colour.
When calibrating your monitor, set your target white point and Gamma curve to 5000k and Gamma to 2.2. All files must be submitted in sRGB colour space.
After the monitor has been calibrated verify the calibration process by placing a small test print order. We recommend using images that you generally shoot. Compare the test prints with the monitor.
Lastly, because of ongoing use, we strongly recommend calibrating your monitor every 2-4 weeks.
With visual calibration compromises will need to be made in how close your prints will match your display. How you see colour and hardware limitations all contribute this method not being an exact science, though this method is better than no calibration at all.
To get started using this method you will first need to submit your four free 8x10 prints to Nulab, when you receive them back you will need to compare them to the files on your monitor. Remember your files on your monitor need to look like the prints you have received back from us. You will need to use the buttons/dials on your monitor.
Before you start making adjustments write down your monitors values, this will be handy in case you need to go back to your original settings. Set your monitor to 5000 degree Kelvin as the display temperature. 5000K is chosen because it is closest to daylight.
Look at your print and notice what disturbs you the most about it, is it too bright, too dull or contrasty? Adjust this first do not be afraid of making big adjustments. At first make large adjustments to see if you are using the correct tool. When you have determined you are making the correct adjustment make smaller adjustments until you are happy that the file on your monitor look more like the print. Once you are happy with your first adjustment continue to work through anything else you do not like about the print.
Remember there is no calibration method that is perfect; the best that can be accomplished is a reasonable representation of the print. To verify your calibration is correct order a couple of more prints to compare to your monitor now that you have adjusted it.
Please save your files in sRGB colour space in 8-bit colour, not 16-bit, to achieve the best print results. Also, please do NOT embed any profiles. Please - no CMYK, Grayscale, RAW, PSD or LZW compressed files, and if you work in layers, be sure to flatten the file and remove any extra channels before sending. We print from JPEG format files. Highest quality JPEG compressions are more than adequate for high quality printing. It is nearly impossible to distinguish a JPEG print from a TIFF print with the naked eye.
It is best to save your files at 300dpi sized at the size print you require,
File Specifications:
Nulab Cloud is designed to work from your files as supplied to us. We suggest that you use our monitor calibration information in the colour management section as a guide.
Retouching and colour correction services are available for an additional fee via Nulab Digital Express (NuDE). If you would like access to the NuDE ordering software please contact us to discuss your requirements.
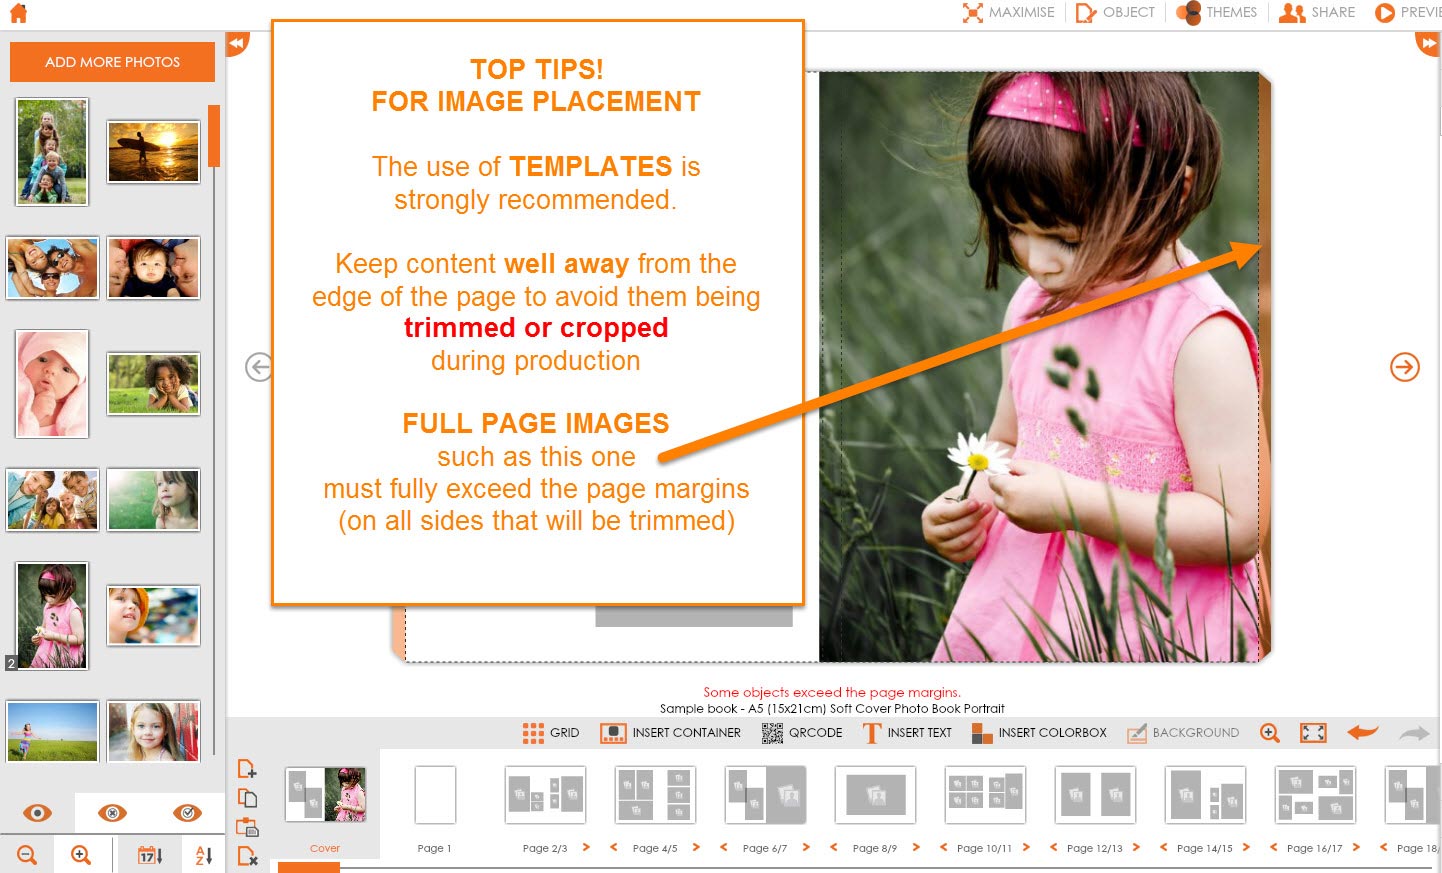
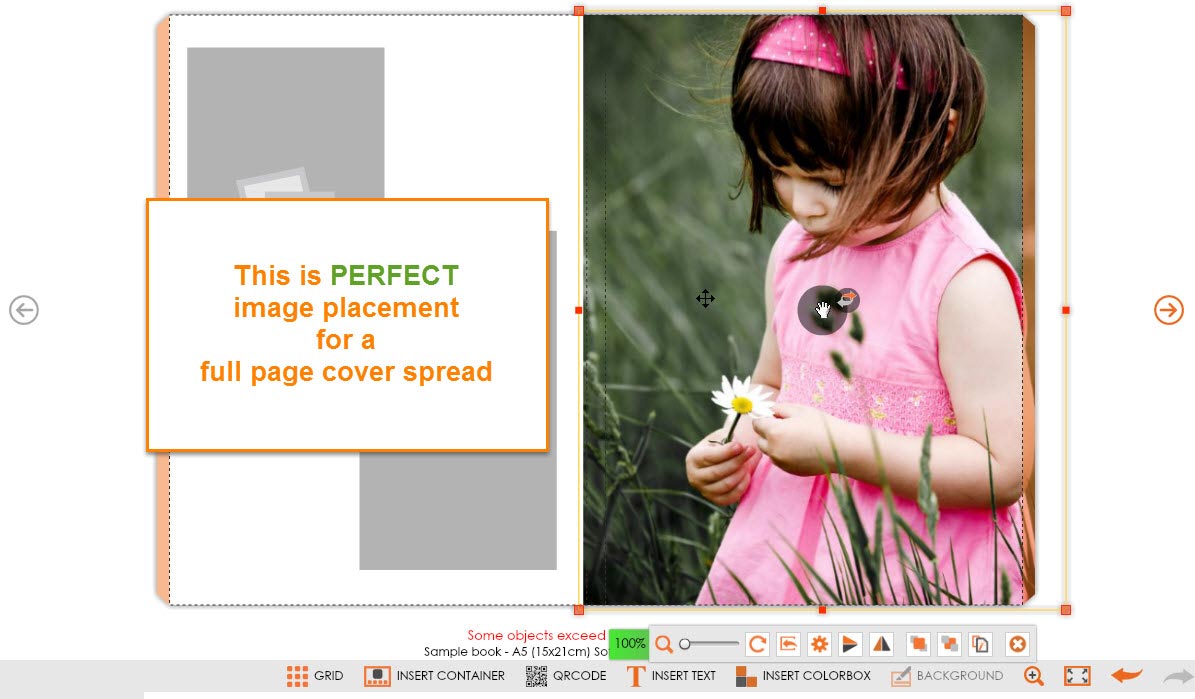
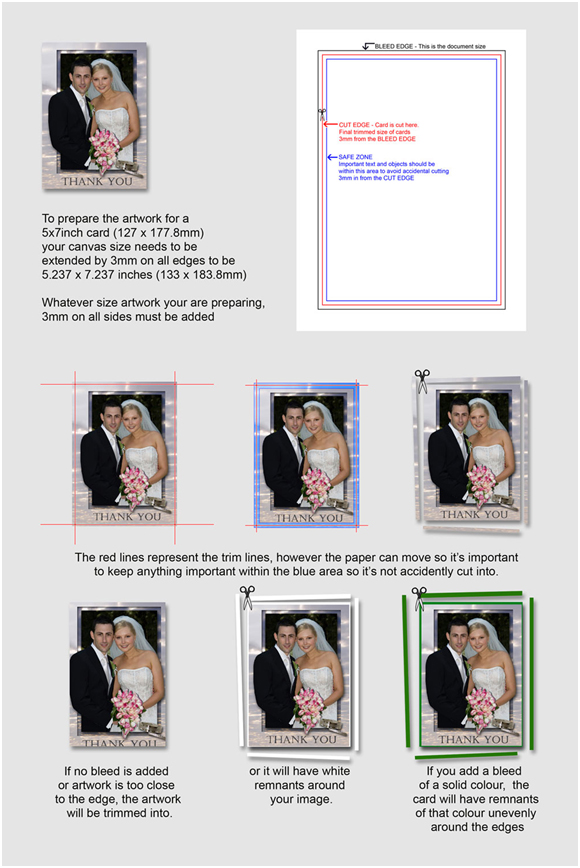
Yes. All products require some final trimming of pages (up to 3mm from every side), so they can be neatly finished. Be careful of critical image detail left on the edge of your pages. The area that may be trimmed is referred to as ‘bleed’. See below for more information.
![]()
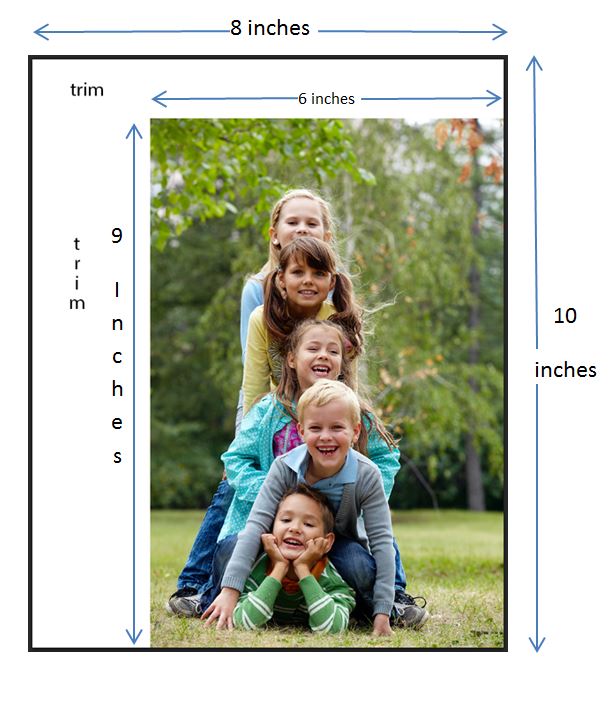
Nulab Cloud allows orders for standard print sizes only. However you can have a custom size by placing your file onto a canvas in Photoshop. Simply go to canvas size and make your canvas the next standard size up from the size you require. Place your file into the corner of the canvas and using the text tool type trim into the area you need trimmed. Please note only prints 12x18 and above will be trimmed. See example below.
Custom sized prints are available via Nulab Digital Express (NuDE). If you would like access to the NuDE ordering software please contact us to discuss your requirements.
Yes, we do offer colour correction and retouching for an additional fee. Please note: Colour correction adds one extra day to service times, retouching adds three extra days to service times.
These service are only available via Nulab Digital Express (NuDE). If you would like access to the NuDE ordering software please contact us to discuss your requirements.
![]()